Art book ‘Journey’
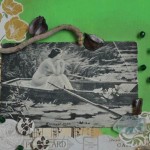
Art-book it is a collage or a few collages created on a particular topic, and collected in the same notebook. The main difference between the art-book on the art – magazine is that art book created on a particular topic, and art magazine collected under one cover work on various topics.

You can use any means of expression for creativity. To place an art-book can be used paints, varnishes, pencils, markers, magazine clippings, fabric, natural material, buttons, thread, and all that can be found at home!

You can select any theme for the art-book. All depends on your personal preferences and interests. The main thing – to create art-book just for yourself and not for someone else. By the way, is a high probability that your work will interest other people. So do not hide your work, share your findings with friends, relatives, acquaintances – and you will find new like-minded people!
Travel is a great theme for art-book. We bring a lot of photos, brochures, maps, tickets from travel. Why not put it all in one place? You can add your notes to make interesting travel journal!

Making of Art book

First you need to choose a theme for your art-book. Fond of cooking, collect interesting recipes? Then, of course, your first art book – cooking. Maybe you’ve always wanted to fix photos, maps and notes of last trip? Then make a travel-book.
We will need:
- basis for scrapbook album or notebook ;
- materials on the subject of art-book;
- a broad brush;
- Acrylic paint or gouache;
- Scissors;
- Glue;
- double sided tape;
-
Stapler;
1. Collect all related materials, choose a basis (a notebook or journal in which we will create). Sheets art-book can be painted with acrylic paints and gouache – to taste.

2. Choosing materials that ‘requests’ on the first page. This may be the most important, the most vivid impression of the journey or if you are creating travelbook in chronological order, the first thing with which you encounter on the trip.

3. Paper cuttings can be stuck on tape, adhesive squares, glue and even just on the acrylic paint, if it has not dried up.

4. Folded cards can be attached to the page using the stapler so that they are convenient to deploy.

5. Using clips and staples can attach to the pages of the materials of different sizes. So do not give up immediately from cuttings, which are larger than the selected basis for art-book

6. Once the basic materials are located on pages, sign them. The page title can be composed by letters from magazine clippings. Or type the desired text in the film, scrap paper or the most plain paper for the printer and cut the inscription.

You can add any log notes, make sketches, decorate the page as you wish. Allow yourself to freely create your own history.
As a rule art-book has no cover. Or you can make it after the completion of the art-book. No unnecessary details on the cover should not be – only needed.


